|
|

|
| Γνήσια αξεσουάρ & ανταλλακτικά κινητής τηλεφωνίας! | |

  |
Special offers!

Delivery with BOXNOW Contact with us for more information (UNTIL 60X45X17CM) MEDIUM
Delivery with BOXNOW Contact with us for more information (UNTIL 60X45X17CM) MEDIUM DELIVERY-BOXNOW (SIZE: 60X45X17CM) MEDIUM3,23€+VAT  4,01€ 4,01€ 
Delivery with BOXNOW contact with us 2109566401 (until 60X45X08CM) SMALL
Delivery with BOXNOW contact with us 2109566401 (until 60X45X17CM) SMALL DELIVERY-BOXNOW (SIZE: 60X45X8CM) SMALL1,61€+VAT 2,00€ 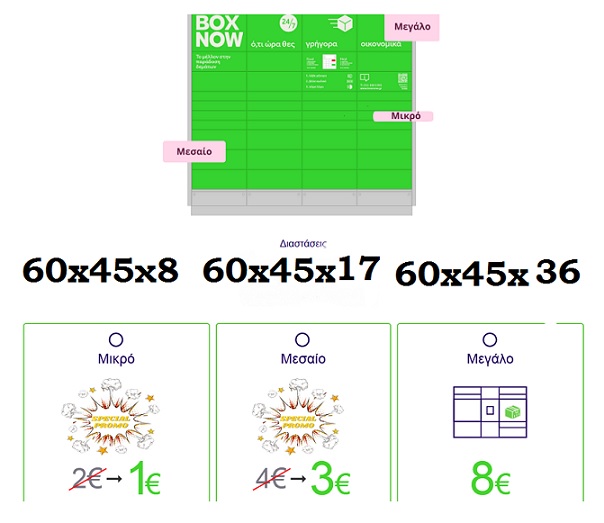
Delivery with BOXNOW contact with us 2109566401 (until 60X45X36CM) BIG
Delivery with BOXNOW contact with us 2109566401 (until 60X45X36CM) BIG DIMENSION DELIVERY-BOXNOW (SIZE: 60X45X36CM) BIG6,45€+VAT 8,00€
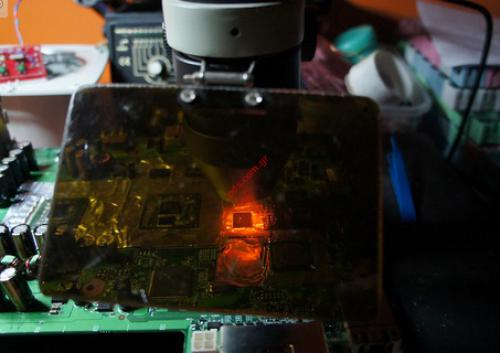
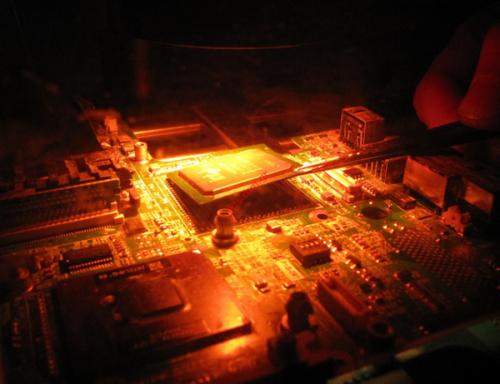
Infrared welding repairYAXUN T-862D+ with Hot Air and soldering station 936
Adopt infrared weld technology which independent exploration. 2. Use infrared heat,it is easy to cut through,heat proportion piercing tradition weld machine with sirocco. 3. Easily operate.Just need one day training.Can operation this machine. 4. No need weld tools,it can weld all the component of 15x15-35x35mm. 5. This machine has 650W heating system.widely to 120x120mm. 6. Infrared heating no have sirocco flow. Don't impact perimeter scomponent. Can suitable for all of the component,especially Micro BGA component. Description operation method: 1。Locate, choose and attach the appropriate lens:The usable of the lenses diameter are 28mm, 38mm, 48mm. (1)When the area of the chips is below 15mm*15mm, please choose the IR-lamp temperature about 160-240℃, and choose the lens which D=28mm to avoid destroying other places, usually it will take you about 20-40seconds. (2)When the area of the chips is between 15mm*15mm and 30mm*30mm, please choose the IR-lamp temperature about 240-320℃, and choose the lens which D=38mm to avoid destroying other places, usually it will take you about 30-60seconds. (3)When the area of the chips is above 30mm*30mm, please choose the IR-lamp temperature 350℃(Attention: you should turn on the pre-heat dish first, and set-up the temperature about 150-200℃,wait 3-5minutes to allow the temperature steady on the set-up temperature),and choose the lens which D=48mmto avoid destroying other places, and keep the lamp body direct light. You should control the time carefully to avoid burning the chips. Warning: The light system will shoot straightly. Please pay more attention to yourself control time to avoid burning out. 2. Open the machine (1) Check if the connection wire of the lamp body and the 936-Iron is ok. (2) Locate and attach the power cable to the rear of the re-work station (3) Confirm all front panel rocker switches are off. (4) Place the rear AC Power Switch in the ON Position. (5) Allow the T-862++ Power-On-Self-Test (POST) to complete. (6) Temperature set-points will display last value used. (7) Place the target PC Board on the slip-rack and orient to close proximity of estimated position of focused Infrared light, (8) Adjust the T-862++ Infrared light system height, allow 20-30mm from lens end to PC board target component. (9) Turn on the two switches. They control warm-up plate and light system. 3. PC Board Component Removal and Replacement. (1)Put the PCB board onto the holder (2)Turn on the switch of the pre-heat dish, and set-up the temperature (3)Turn on the switch of the IR-Lamp, Regulate the temperature (the temperature must be warm enough to allow the solder to be liquefied), focus the Infrared light on the chip to be removed. (4)Once the solder liquefied and melted, use tweezers to remove the chip。 4. Soldering a chip. (1) Clean the target pad with the brush (2) Then put the solder ball and a flat of solder flux on the target pad (3) Turn on the switch of the pre-heat dish, and set-up the temperature (4)Turn on the switch of the IR-Lamp, Regulate the temperature (the temperature must be warm enough to allow the solder to be liquefied), focus the Infrared light on the chip to be solder (5) Wait to allow the Infrared lamp to heat the solder flux to work as the solder balls on the target chip pad reaches liquid temperature. Use tweezers or a vacuum device to place the chip target position. Once the solder liquefies, the chip will be sold automatically. After cooling the chip, pick up the PCB board, check if it is ok. If not, re-operate. 5. The use of the 936 searing-iron It can be used separately, But be sure it must be connect with the chassis. If the component is too small, you needn’t use the IR-lamp, the 936 searing-iron is enough. Open the switch of the 936 searing-iron, set-up the temperature, then use it as you want. Maintenance: ü At all times – Insure the light body cooling fan is unobstructed and clean. ü Use a little machine oil. Lubricate the focus holder and cell guide to inhibit rusting, keep them ease to operate. Warning ! The T-862++ System creates temperatures in excess of high degrees via Infrared Light. Wear appropriate eye protection or any device within the T-862++ when using it. After use, Do not cut the power immediately, confirm the light body is cool-to-touch, Turn off the power switch, then place the system in airiness & safety storage. Do NOT use this system or any associated device in an environment conducive to fire or electrical overload. Disconnect the AC Power Plug when not in use. When using, it is of high temperature, Do NOT allow children or the un-trained to touch the T-862++. |
Quick product search
|


Members login |
Newsletter |
| Terms of use | Shipping and returns | |